
Aviatik Berg D.I series 115
- 1/48 - AMC Flashback.
HISTORY.
One of the "forgotten" fronts during WWI was the Italian
Front. This front was a battle primarily between Austro-Hungarian (A-H)
and Italian troops with over 1,000,000 men killed during the Great War.
Geography was the dominant theme in this front, with mountains
dominating over the 400 mile length of the Italian Front, with mountain
warfare being fought in the Dolomites, Carnic Alps, and Julian Alps in
which avalanches were one of the most dangerous weapons of war. The
fighting was particularly intense and deadly along the Isonzo River,
where the Italians suffered approximately half of their casualties
during the war. No less than 12 battles were fought in this scenic river
valley sandwiched on the edge of the Julian Alps, culminating in the
famous battle for Caporetto in which over 800,000 Italian troops had
been lost to death, wounds, capture, or desertion effectively
eliminating the Italian Second Army while AH losses were approximately
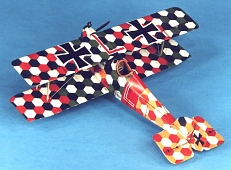
5,000. The aircraft modeled is one flown by A-H ace Frank Linke-Crawford
who posted a total of 27 victories over the Italian Front before being
shot down and killed on 30 July 1918 by two Italian Hanriot fighters.
 |
THE KIT.
The kit is Flashback's 1:48 Aviatik D.I "Berg". It is
generally considered to be a limited run kit (due to the low
production run) however the quality of the injection molding is
very good, as it was produced by the same folks that produce
current Eduard kits. Therefore, I do not consider this to be a
"limited run" kit, as the quality is far above what
one normally sees. This is a true multi-media kit featuring
injected molded plastic parts (23 parts), finely cast resin
parts (3 items) (engine), a simplified P/E sheet (12 items) (including
wire wheels!), and a complete A-H lozenge decal set along with
markings for one aircraft flown by Frank Linke-Crawford. The
instruction sheet is an eight-page fold-out diagram assembly
with marked color painting guidelines and a full rigging diagram
(yaaaay!). |
CONSTRUCTION.
I started with my usual warm, dish soap water wash of the
plastic, resin, and photo-etch components and followed with a
cold water rinse. Pat dry with a paper towel and let dry
overnight. The wash does really help, especially on the resin
and photo-etch parts. I then pre-painted all the parts as
indicated in the instructions. For a change, assembly did not
start with the cockpit but the engine! |
 |
Be very careful when
installing the completed engine to its mount, make sure you get
everything aligned along the centerline EXACTLY (this is not
easy as I found out later!). I also wrapped the engine in
Parafilm to prevent overspray. Next up was the cockpit. No
significant difficulties were encountered here except some of
the PE bulkheads required a little filing off the sides in order
to fit within the fuselage. After closing up the fuselage by
gluing the two halves together I noticed that I missed by just a
hair in lining up the engine along the centerline. Boy, I sure
thought I had that sucker dead-on when I first put it in! Next I
drilled and dry-fitted all of the rigging, strut, and landing
gear mounting holes to assist in final assembly as nothing is
more frustrating as trying to get these pieces together with a
fragile model. After stuffing some wet tissue paper into the
cockpit opening, it was off to the paint shop (more
realistically the decal shop!).
 |
PAINTING AND
MARKINGS.
The paint scheme is very
simple; a clear doped linen (CDL) undersurface as most
of the model is decals. I used Gunze Sangyo Sail Color
(H85) airbrushed on for the CDL. After drying overnight,
I airbrushed a light coat of Future to prepare the
surface for decaling. The lozenge decals supplied with
the kit are pretty good, but several sources consider
them to be inaccurate in color as being too bright. Also,
the kit decals go down stubbornly over the surface
detail so I would recommend replacing them with Americal
decals that are the correct color and much thinner. |
Of course I am much too cheap to
do this (besides, I liked the bright colors!) so I struggled
through many cycles of slicing, pricking, and massive doses of
decal solvent. Most of the decals suffered cracks over the
raised detail on the forward fuselage but went down beautifully
over the flatter surfaces. Fortunately, spare hexagons of the
decals are supplied so these were used to cover some of the
cracks along with the appropriate color paint. You have to look
really closely to see them so the end result is not that bad.
Only one decal option is provided for Linke-Crawford's aircraft
flown with FLIK 60J. These markings are very good with one
exception. Reportedly FLIK 60J used a black fuselage band as a
squadron marking and not the red one supplied in the kit. Also,
the red decals are very translucent so it would be beneficial (and
accurate) to paint the black band instead. Of course I am much
too lazy to do this so I went with the red decals! At least I
have an excuse, I didn't know the red was that translucent!
After drying overnight, I wiped the decals off with a moist
cloth with Pollys Plastic Prep to remove any residue and after
drying I shot a very light coat of Future thinned with rubbing
alcohol (50-50 mix) over the decals to seal them.
| Next,
a light coat of Polly S Flat Finish was shot to provide
a surface for pastels. I then used pastels, and pastel
pencils to lightly highlight the ribs and detail on the
wings/tail surfaces and fuselage. I use Derwent pastels
and pencils and they are quite easy to use, just lightly
draw on the surface to be highlighted and blend with
artists blending stump. A very nice, subtle effect can
be achieved with these pencils that is much easier for
me than dry brushing. Next I applied a heavy burnt umber
oil wash to the wheels and engine undersurfaces and
sealed everything with a light coat of Future. |
 |
FINAL CONSTRUCTION.
Construction of this kit was basically a decal job, so I didn't
assemble the wings and tail surfaces prior to decaling. Now onto
the fun part, putting on this stuff without wrecking the decals!
It actually went much easier than expected (except for the fact
that I kept pulling a Scott and snapping off one of the
stabilizers!), with the only problem being the interplane struts
appear to be a tad bit too long forcing the bottom wing into a
slight negative dihedral. The landing struts and axle were also
installed without any difficulties.
The PE wire wheels and supplied rubber o-ring tires look
absolutely cool! Only problem is, the o-rings are slightly too
large and the wire wheels won't fit. A quick call for help from
the WWI Modeling List (http://pease1.sr.unh.edu/) provided an
incredibly easy solution from Candice Uhlir. She suggested
building a rim from thin styrene strip and placing it inside the
o-ring. This was way too easy as all I had to do was take the
strip, cut it to approximate length, wrap it inside the o-ring
(to get the exact length), cut to fit, and then a dab of liquid
cement to join the ends together inside the o-ring. Took me all
of five minutes to make the rims! I then glued the wire wheels
to the rim using plain old white glue. For those not up to the
challenge, a set of injected molded wheels and lozenge decal
coverings are provided.
 |
I installed some
hypo tubing to simulate the gun barrel and after
installing all the remaining "fiddly bits" it
was time to complete the rigging. I use .006-fishing line
painted silver and use a "through-hole" rigging
method. I basically drill a hole with an #80 bit (the
smallest, about .0135) all the way through the wing at
each of my rigging exit points. |
I try to minimize the number of
exit points and run as many lines through them when possible.
After securing one end to a partially drilled hole (not all the
way through) with superglue, I then run the line out through the
exit hole. I weight the end of the line with a pair of hemostats
to pull tight by letting it hang down and apply a small drop of
superglue to secure it. Let cure for about 30 seconds and then
unhook the hemostats and proceed to the next wire. Repeat until
done! After letting the entire rigging cure for at least an hour,
I then take a brand new Exacto blade and trim flush with the
wing surface. I then sand the exit holes flush and apply a spot
of touch-up paint to cover. That's it, simple, cheap, and fast.
In addition, it also provides a small amount of structural
integrity. I can rig a whole airplane in under an hour! Can't do
that with wire! Finally, several coats of Polly S Satin Finish
was shot to achieve the semi-gloss finish common to most WWI
aircraft.
CONCLUSION.
I think the pictures speak for themselves regarding the
quality of this kit. Outside of the extensive decaling
needed (and the problems getting them over the raised
detail), and the problem with the o-ring tires, this was
an easy WWI build suitable for most modelers. |
 |
REFERENCES.
Albatros Productions LTD, Windsock Datafile #45,
Aviatik D.I,
Text&pictures: Robert
E. Laskodi
|
|

